
Offer a count group to buyers: applications and reservations
Offer a count group to buyers: applications and reservations
Once you are tracking a litter, clutch, or cohort as a count group, you can publish it so buyers can find it, apply, and (when you are ready) reserve a spot with a deposit. This article covers the seller side: publishing, screening applications, taking deposits, and matching buyers to animals. Each choice you make here changes what buyers can do next, so it is worth understanding all of them.
Step 1: Publish the group
Open the count group, go to Settings, and find Public profile. Turn on Visible to buyers, then choose a Public step that reflects where the litter is.
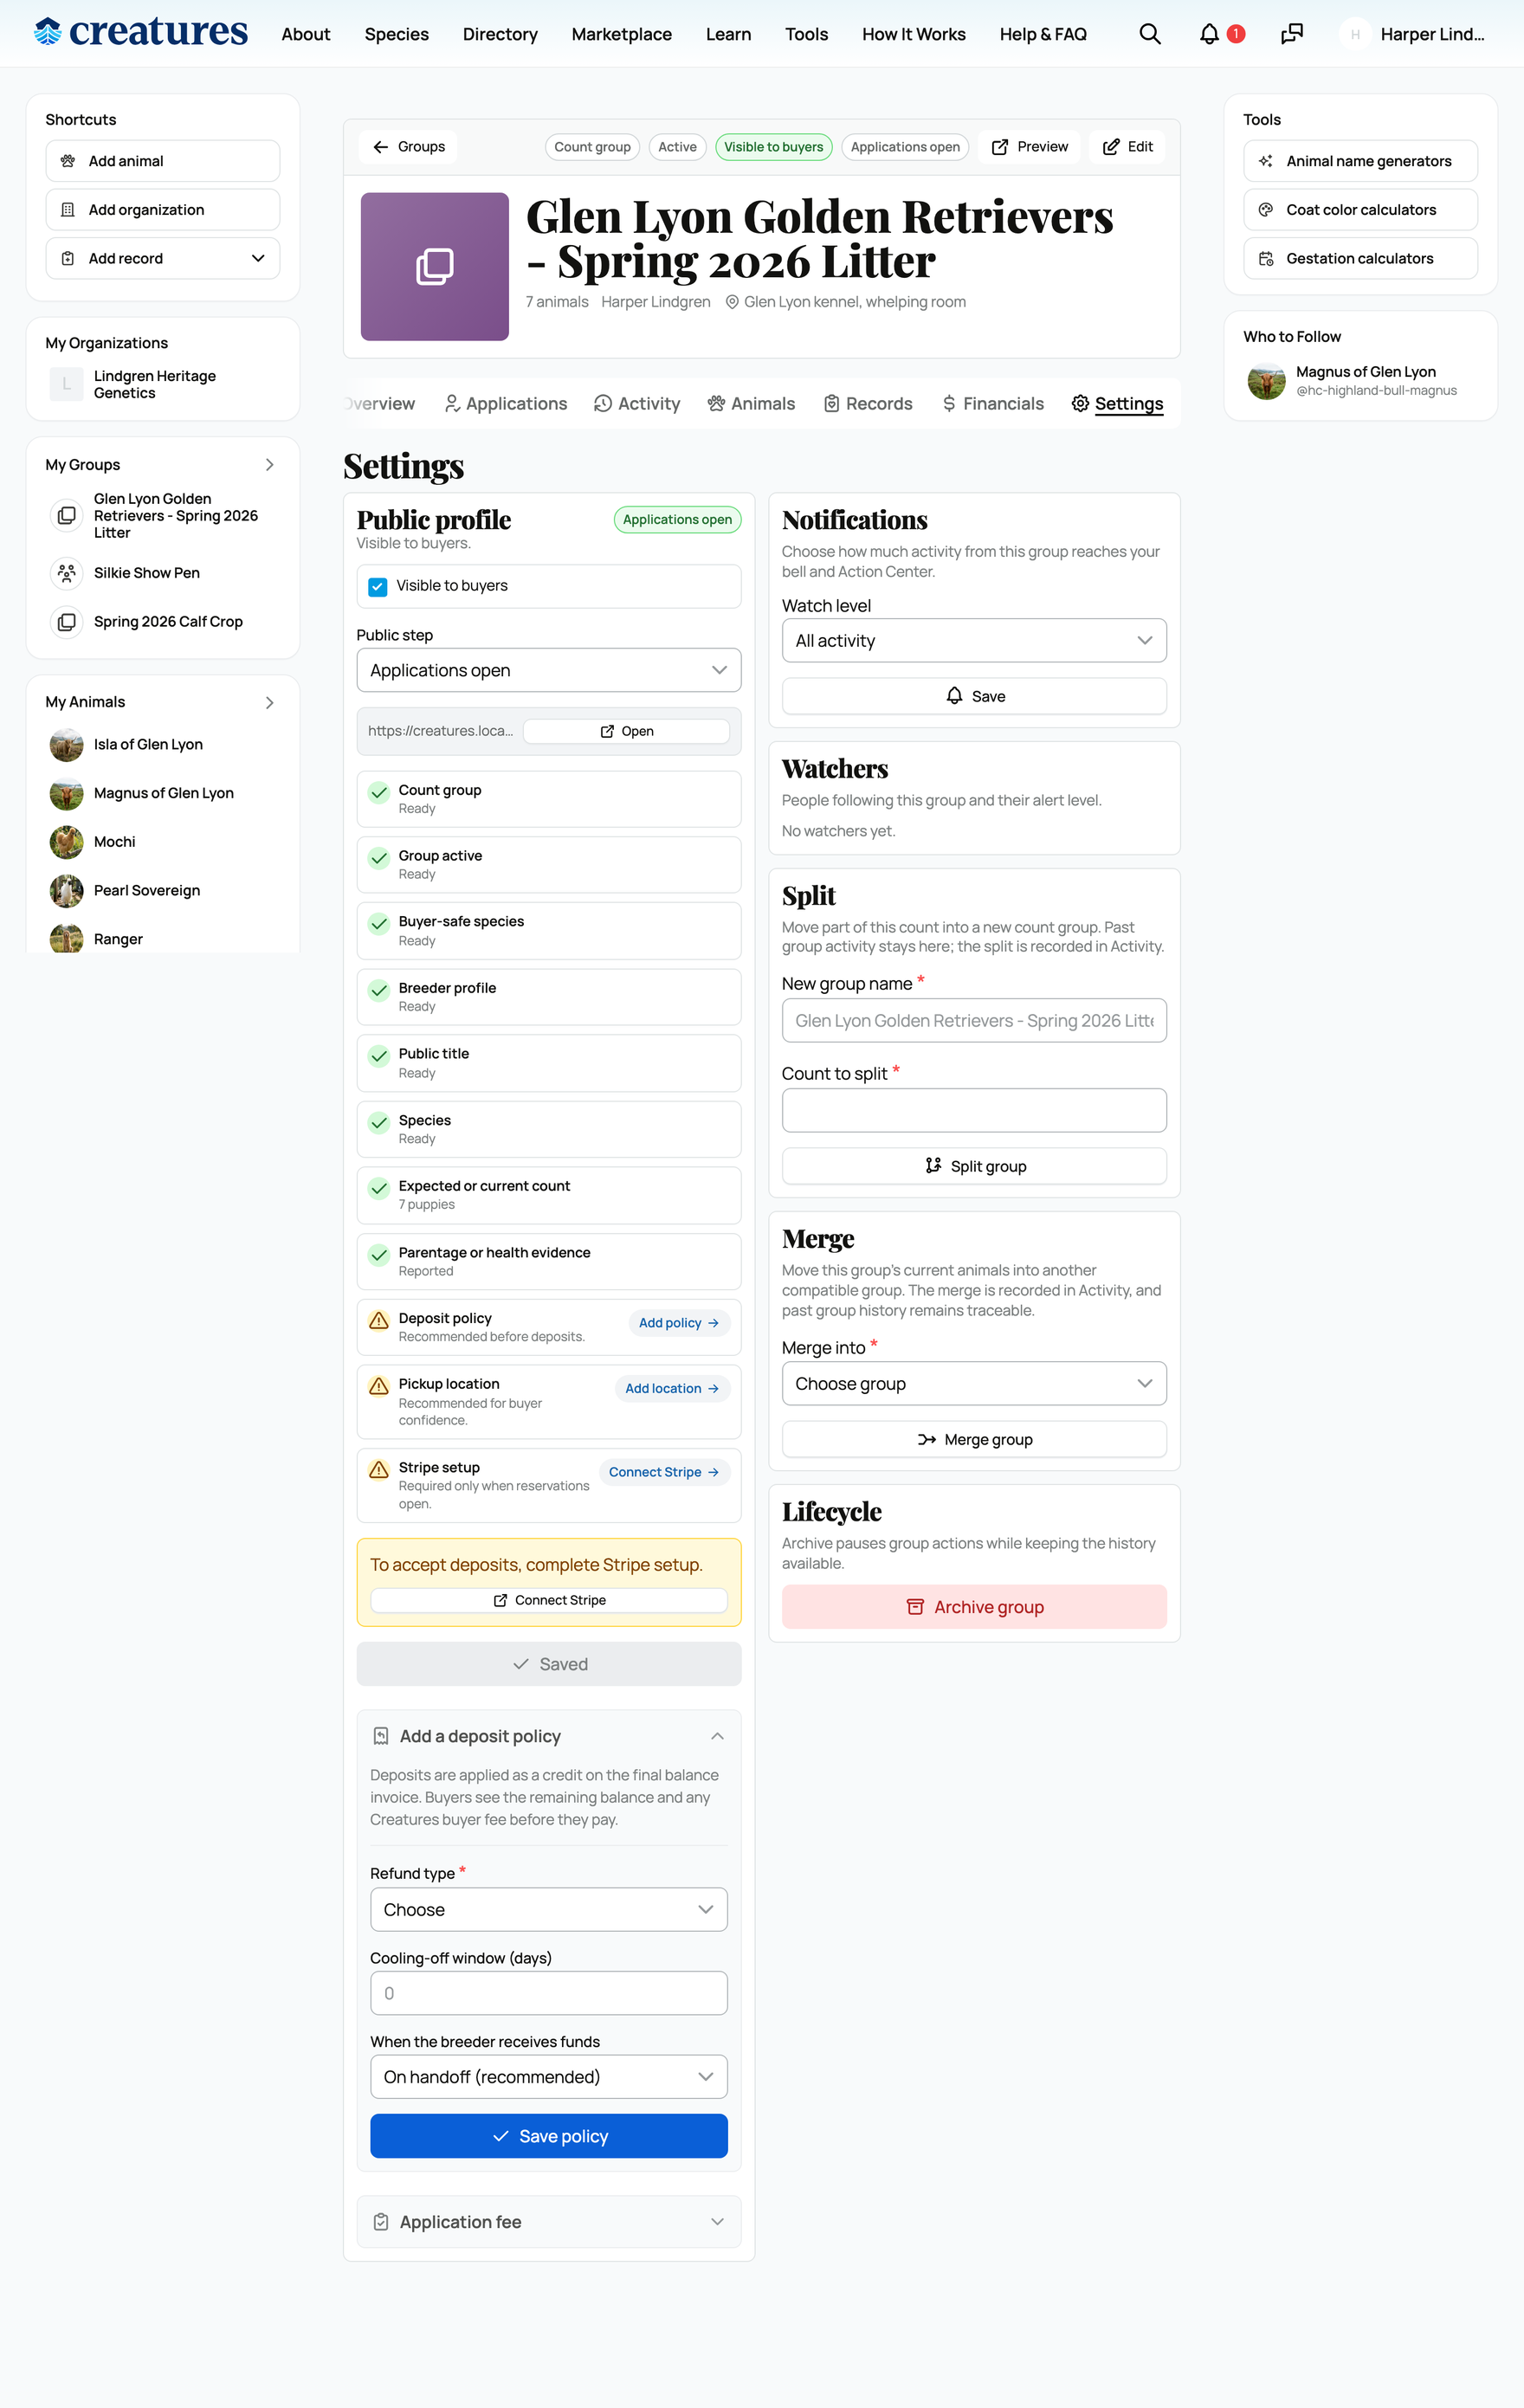
A few things to know before you publish:
- Public profiles are available for count groups only, and a readiness checklist must be clear first: the group needs a buyer-facing name, a species (used for buyer search and profile language), and a count greater than zero (expected, born/hatched, or current). The group must be Active (unarchive it first), and a few species are not eligible for public count-group profiles yet. The checklist shows exactly what is missing, so you always know what is blocking publication.
The Public step, and what each tells buyers
The Public step is a single dropdown that sets the stage you are at. It changes the badge on your profile and the button buyers see, so it is how you signal what buyers can do right now:
- Planned: breeding is intended but animals are not here. Buyers can look and follow.
- Expected: a pregnancy or clutch is confirmed; animals are on the way.
- Born (shown as Hatched for egg-laying species): the animals have arrived.
- Applications open: you are taking buyer applications. Buyers see an Apply button.
- Waitlist full: you are still listed, but not taking new applications right now.
- Reservations open: accepted buyers can place deposits. Buyers see a Reserve action. This is the only step at which deposits can be taken.
- Matching: animals are being assigned to reserved buyers (this is set automatically once you start promoting animals).
- Placed: everything is spoken for and handed off.
- Closed: the group's sale lifecycle is complete.
Set your deposit policy and (optional) application fee
Still in Settings, two more controls govern money. Set these before you open reservations:
- Deposit policy → Refund type (required to take deposits): choose Fully refundable until handoff, Partially refundable (cooling-off window), or Non-refundable once deposit posts. This is the promise buyers see before they pay, so it sets expectations and your obligation if a buyer backs out.
- Cooling-off window (days): for a partially refundable policy, how many days (0 to 30) a buyer has to change their mind and still get the refund.
- When the breeder receives funds (the release trigger): On handoff (recommended), On individual match, or On deposit (released immediately). This decides when the held money actually reaches you. Releasing on handoff is the most buyer-trusted; releasing on deposit gets you paid soonest. Note that deposits are held securely by Creatures until this trigger, then applied as a credit on the buyer's final balance invoice.
- Application fee (optional): a flat screening fee a buyer pays when they apply. It is separate from any deposit and is not credited toward the final sale, so it covers your screening time, not the animal. Standard sellers pay the seller service fee on it; Pro sellers pay no seller service fee. If you set a fee, an applicant must pay it before you can accept them.
- Deposit amount: the dollar figure a buyer pays to reserve. You set it by creating the group's reservation-deposit listing (a fixed-price amount) for the published group. Until an active listing with a deposit amount exists, the readiness checklist flags it and buyers cannot place deposits.
Step 2: What buyers see
Buyers visit your group's public page, where they see your photos, the species and breed, the count and availability, your breeder rating, and parentage details with trust tiers (Creatures-verified, Reported, or Pending). The button they see matches your public step, for example Apply while applications are open or Reserve your spot once reservations open. For the buyer's side of this (how applying, choosing a tier, and placing a deposit look to them) see Reserving from a breeder: applications and deposits.
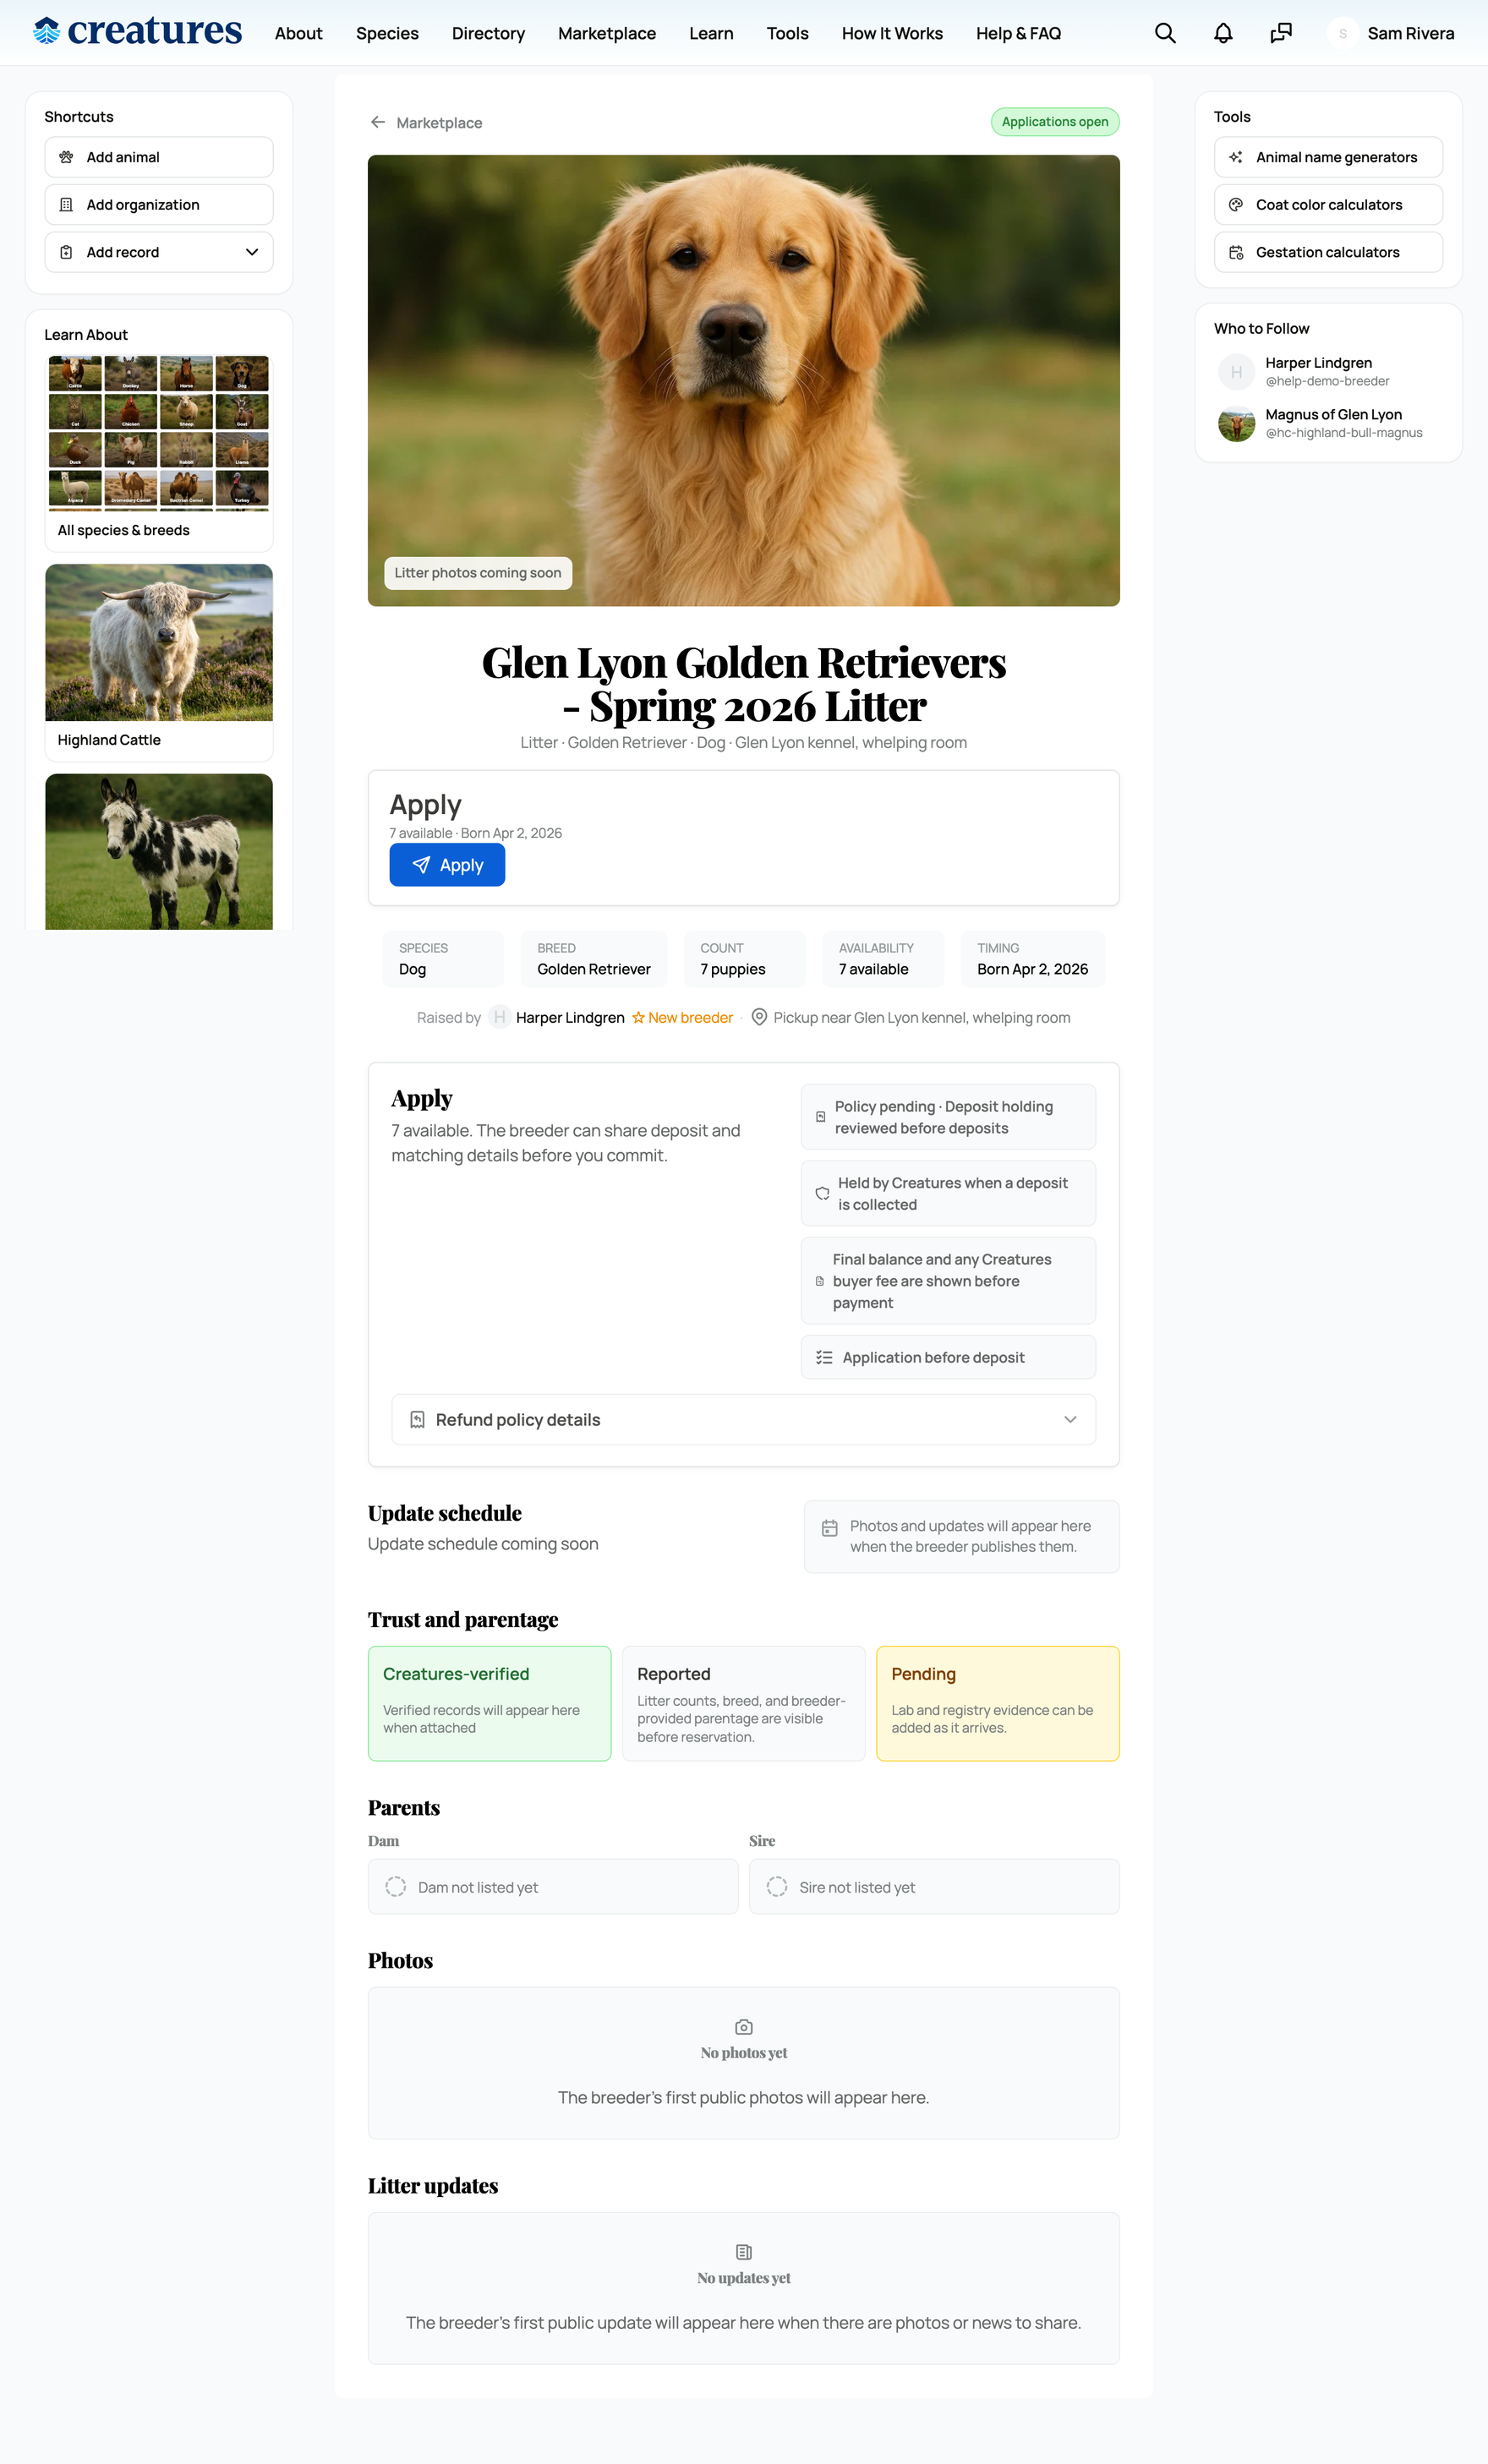
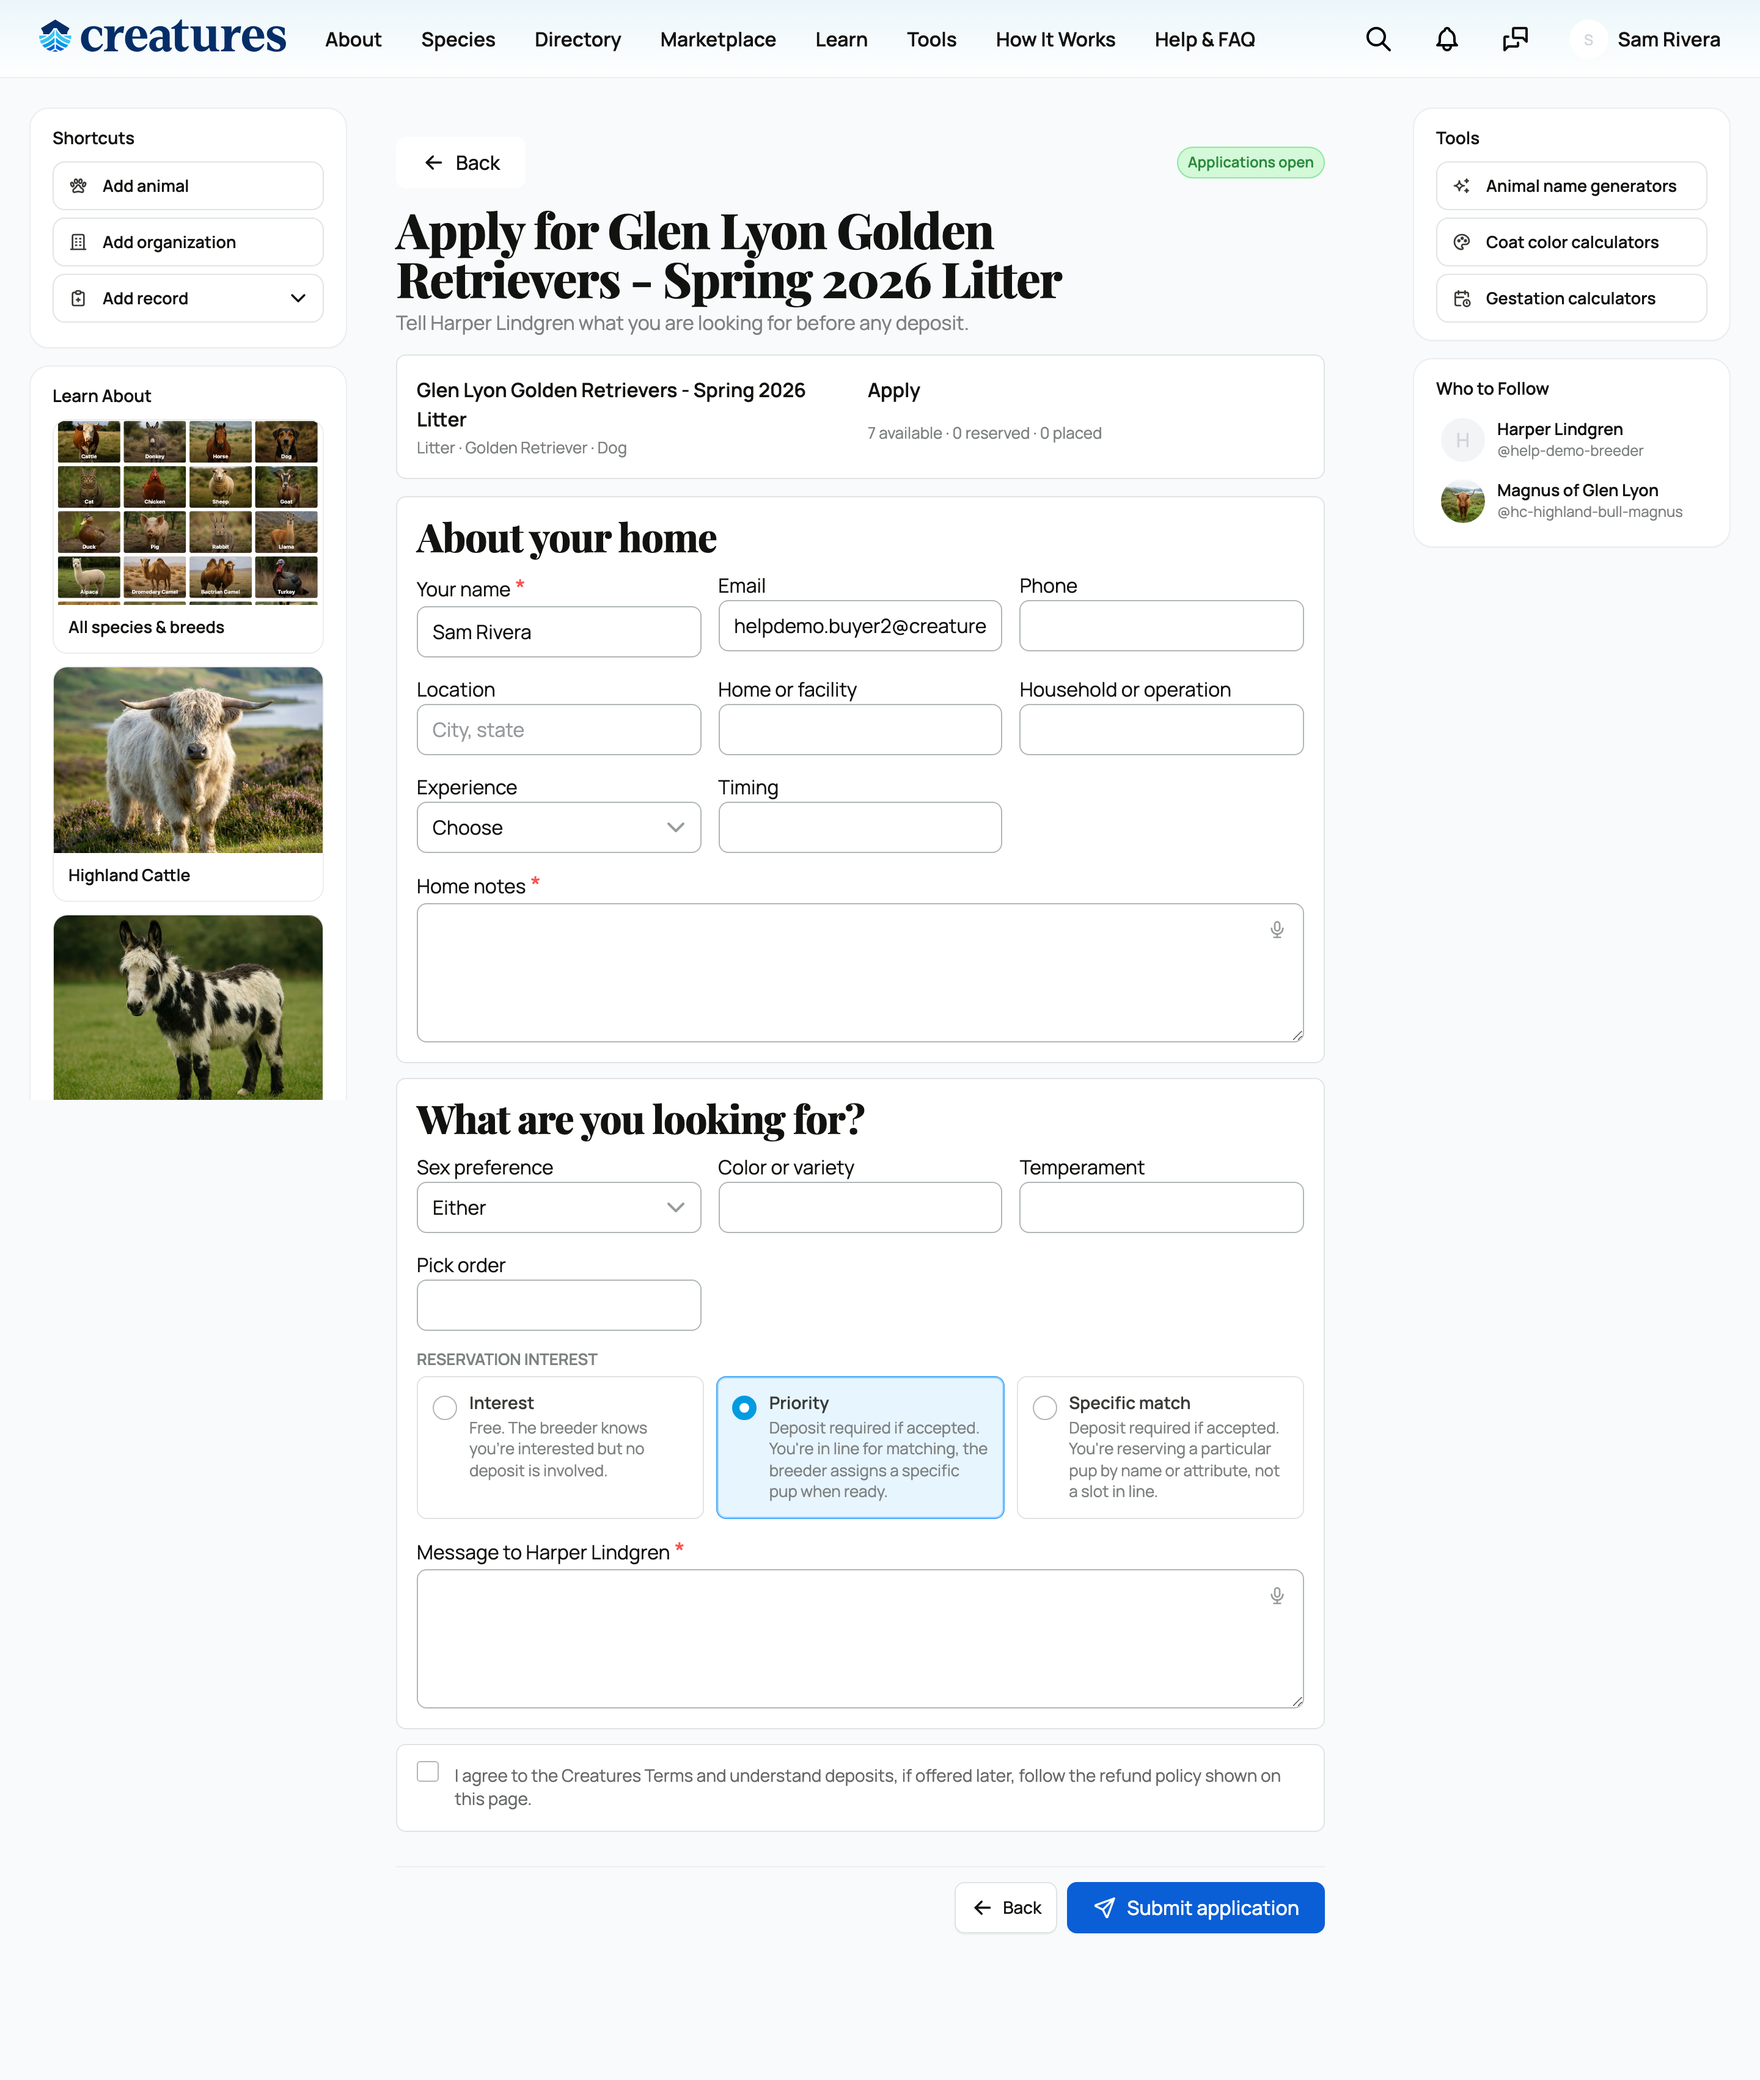
When a buyer applies, they tell you about their home and what they are looking for (location, experience, timing, and a sex/color/temperament preference), and they choose a reservation interest level. That level signals how committed they are and whether a deposit will be involved if you accept them:
- Interest: free. The breeder knows the buyer is interested, but no deposit is involved. Lowest commitment, good for early interest before reservations open.
- Priority: a deposit is required if you accept. The buyer is in line for matching, and you assign a specific animal when ready. Best for buyers who want a spot but are flexible on which animal.
- Specific match: a deposit is required if you accept, and the buyer is reserving a particular animal by name or attribute, not just a slot in line. Highest commitment, for buyers who want one specific animal.
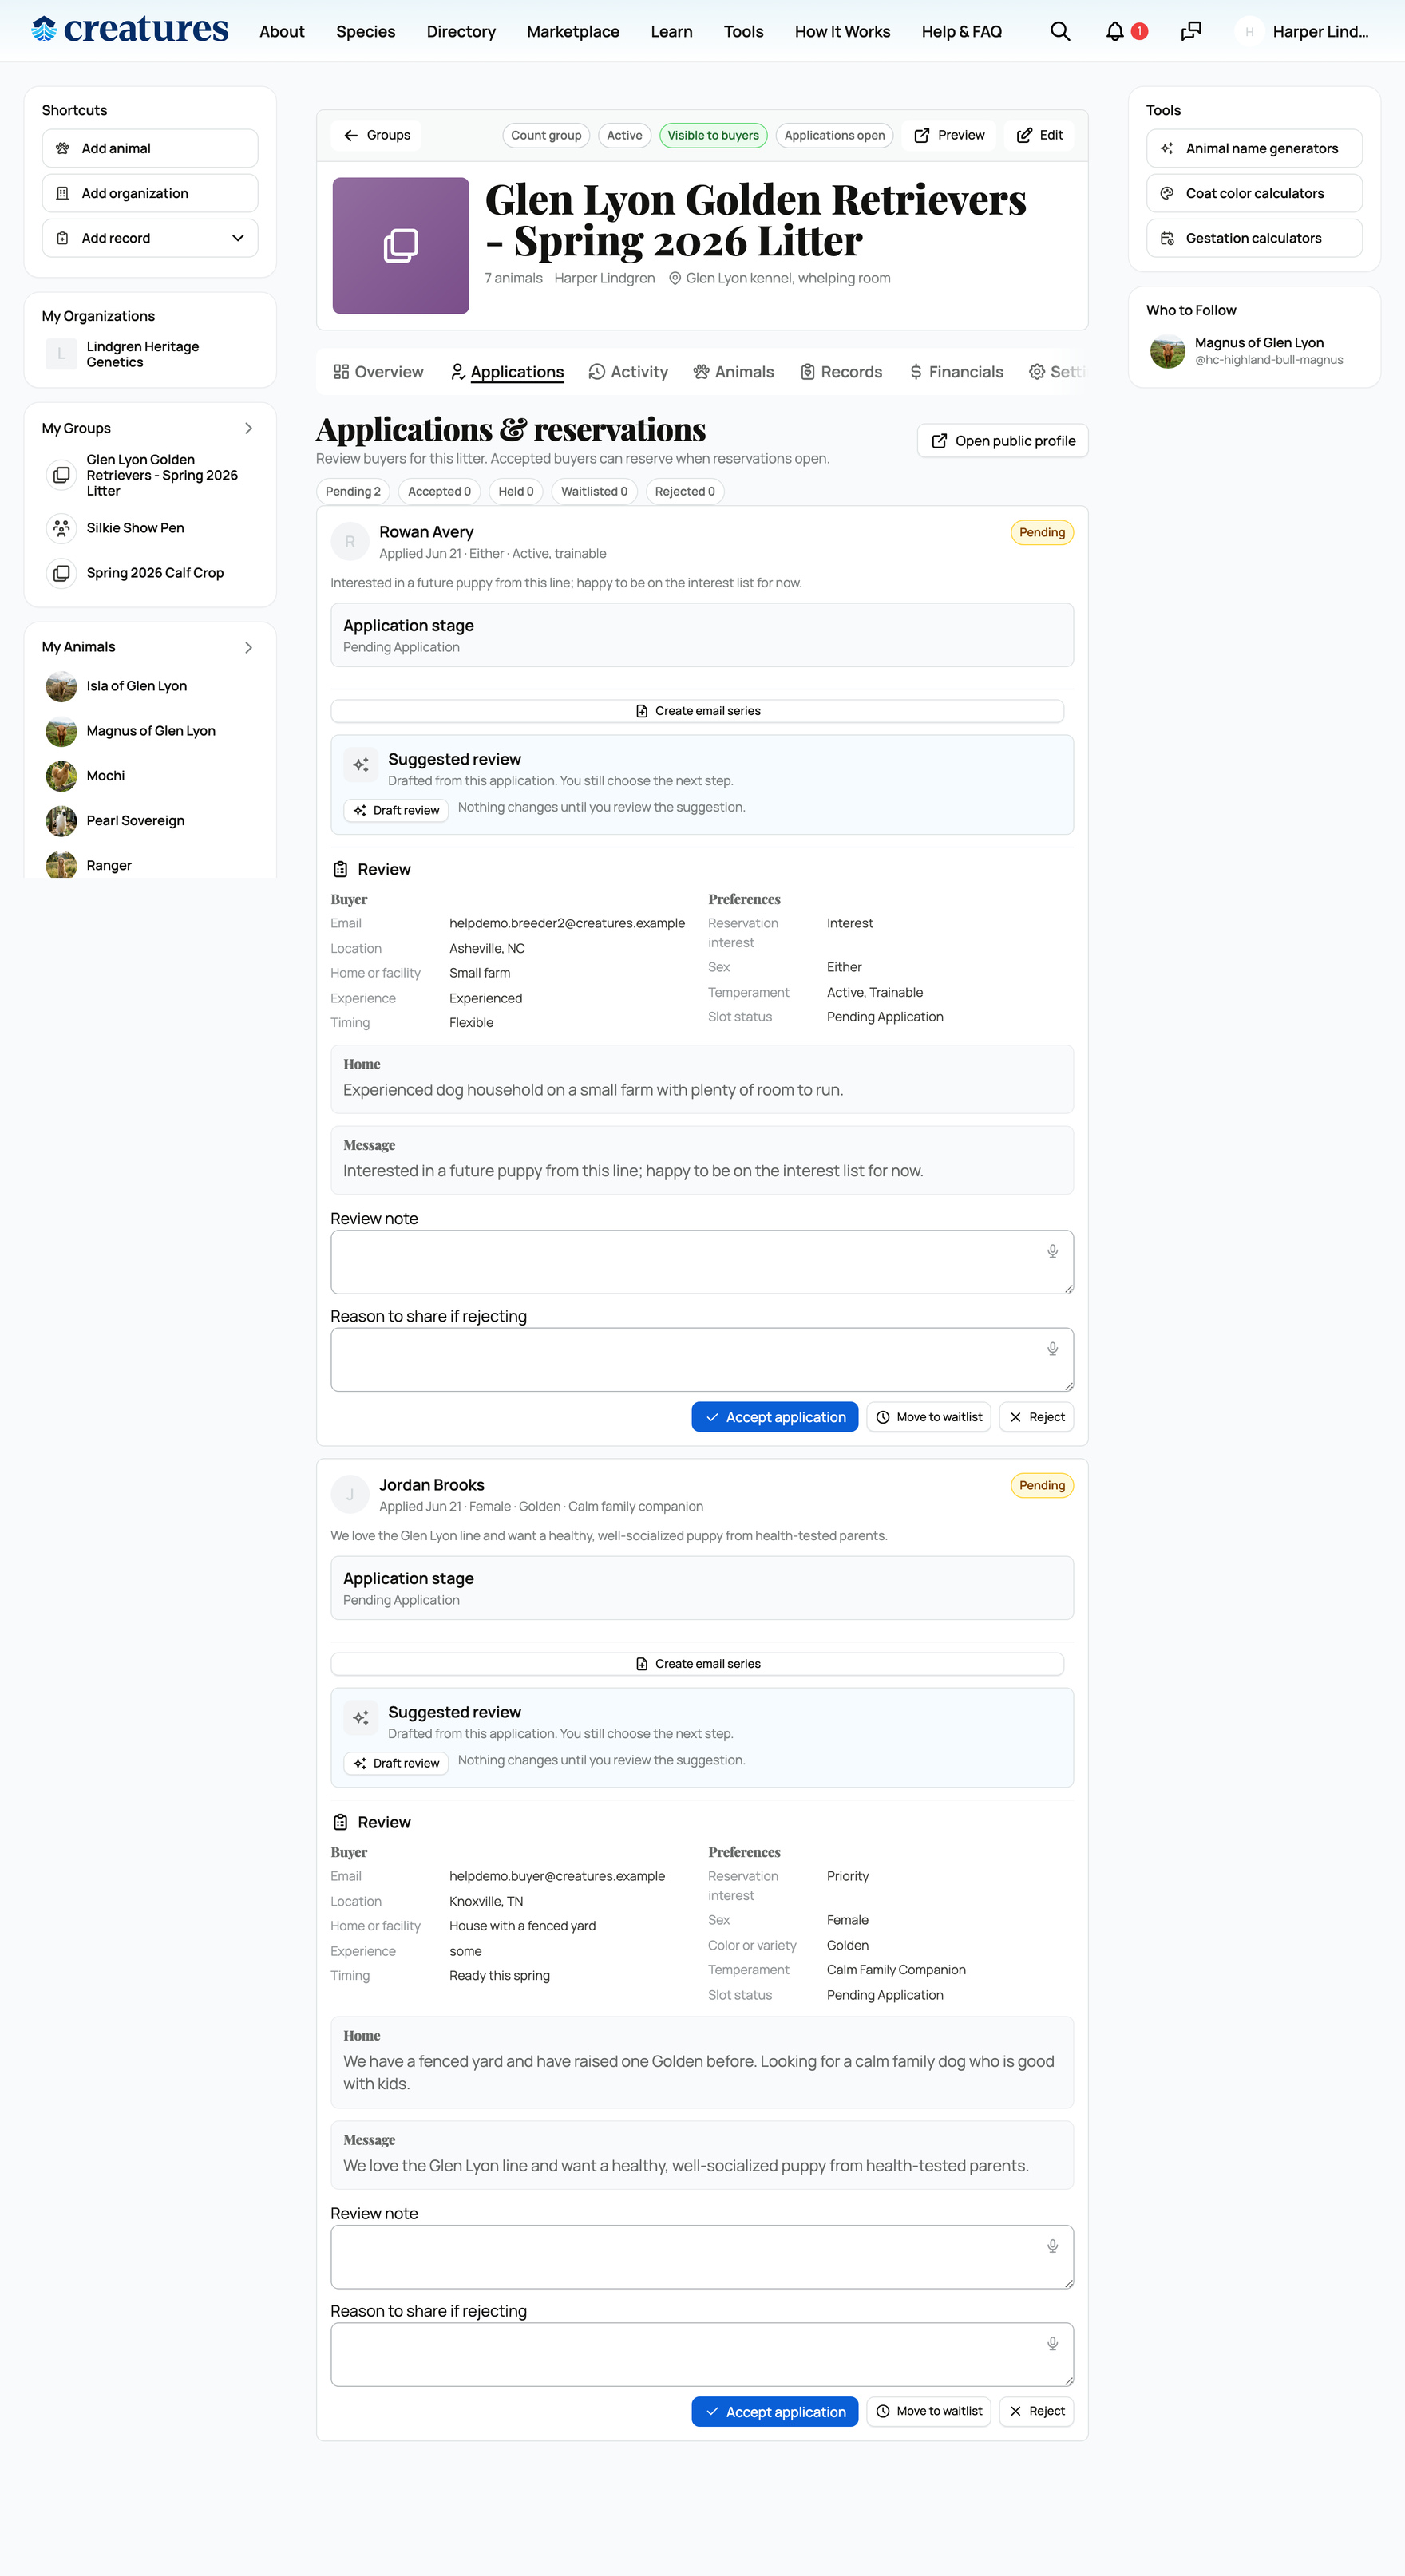
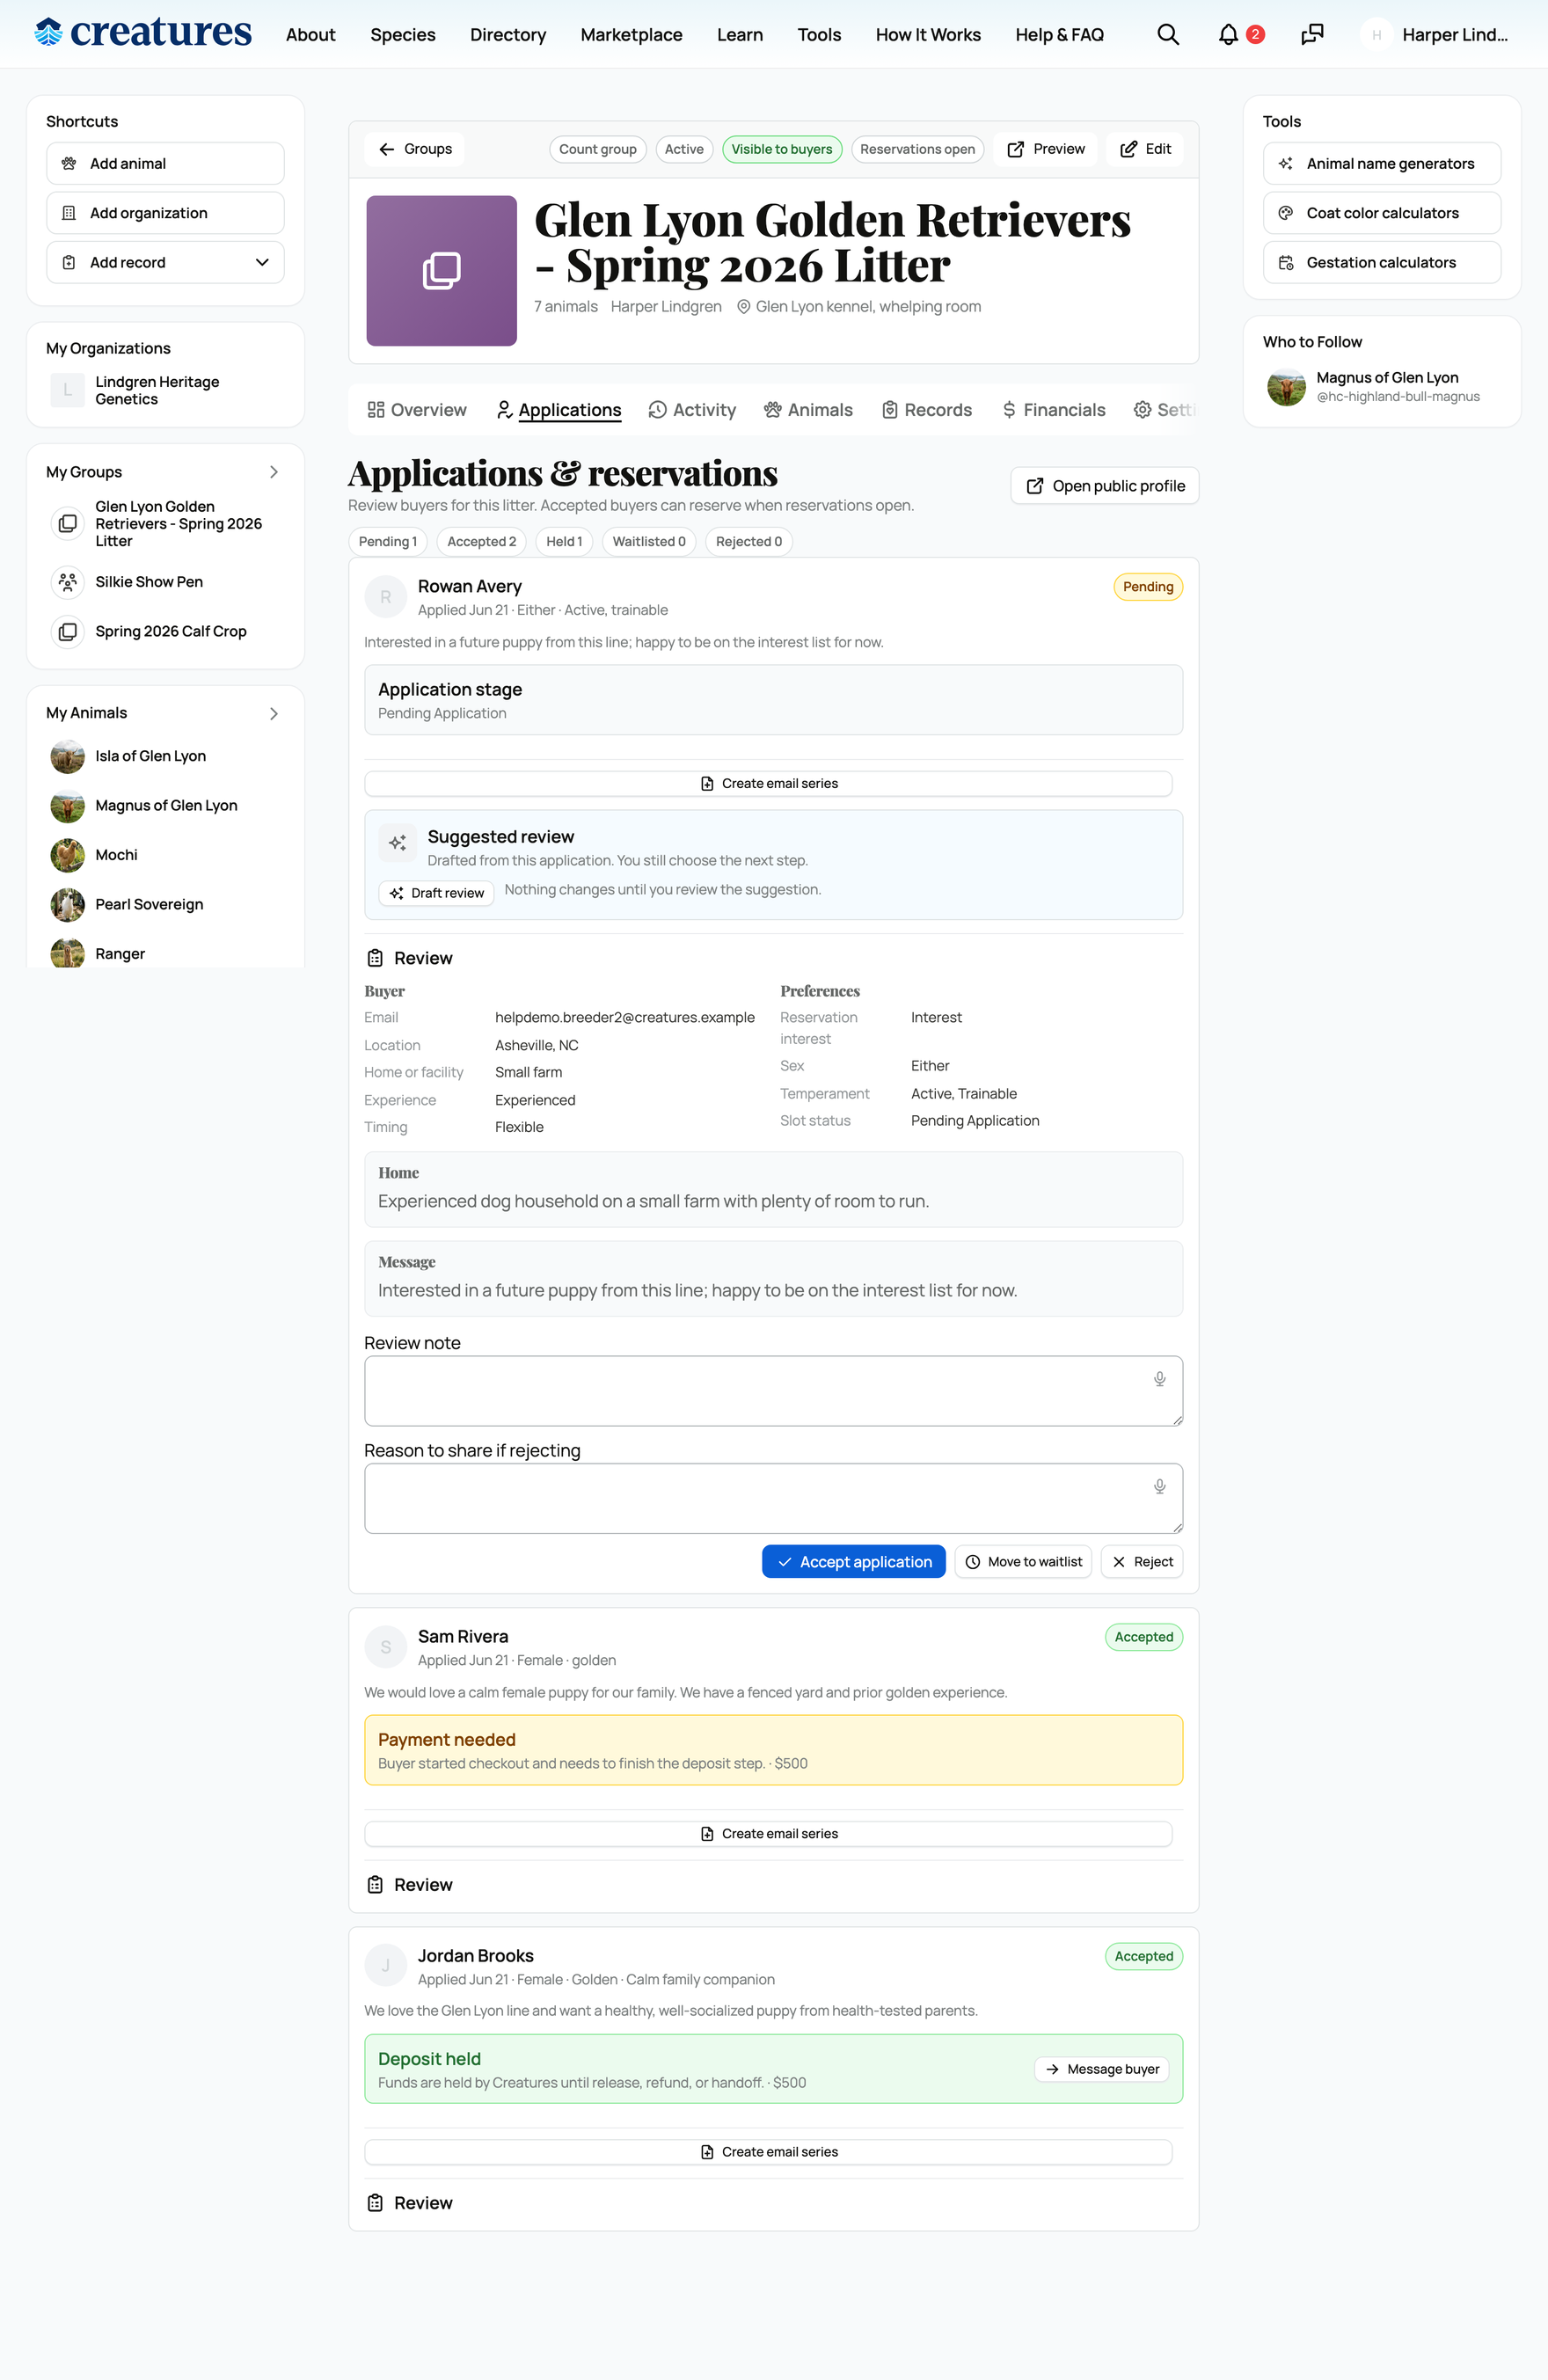
Step 3: Review applications
Your group's Applications tab lists everyone who has applied, with their preferences and message, and counters for how many are waitlisted or rejected. For each application you can add a private review note (only you see it), then choose an action:
- Accept: approve the buyer. For a Priority or Specific applicant, this is what makes them eligible to place a deposit once reservations are open. If you set an application fee, it must be paid before Accept is available.
- Move to waitlist: keep a promising buyer on the list without accepting yet, for example when you are full but want a backup.
- Reject: decline the application, with an optional reason you can share. Rejecting is not permanent for the buyer; they can apply again if their plans change.
Step 4: Open reservations and take deposits
Once you have accepted buyers, you can open reservations so they can secure a spot with a deposit. To take deposits, three things must be in place: your Stripe payment setup is complete (so Creatures can hold the deposit securely), an active deposit policy and amount are set, and your Public step is Reservations open. The readiness checklist confirms each one.
An accepted buyer then places their deposit. They see the deposit amount, your refund policy, and what happens next, and pay by card. The deposit is held securely by Creatures, not paid out to you yet, which is what gives buyers confidence to pay before the animal is in hand.
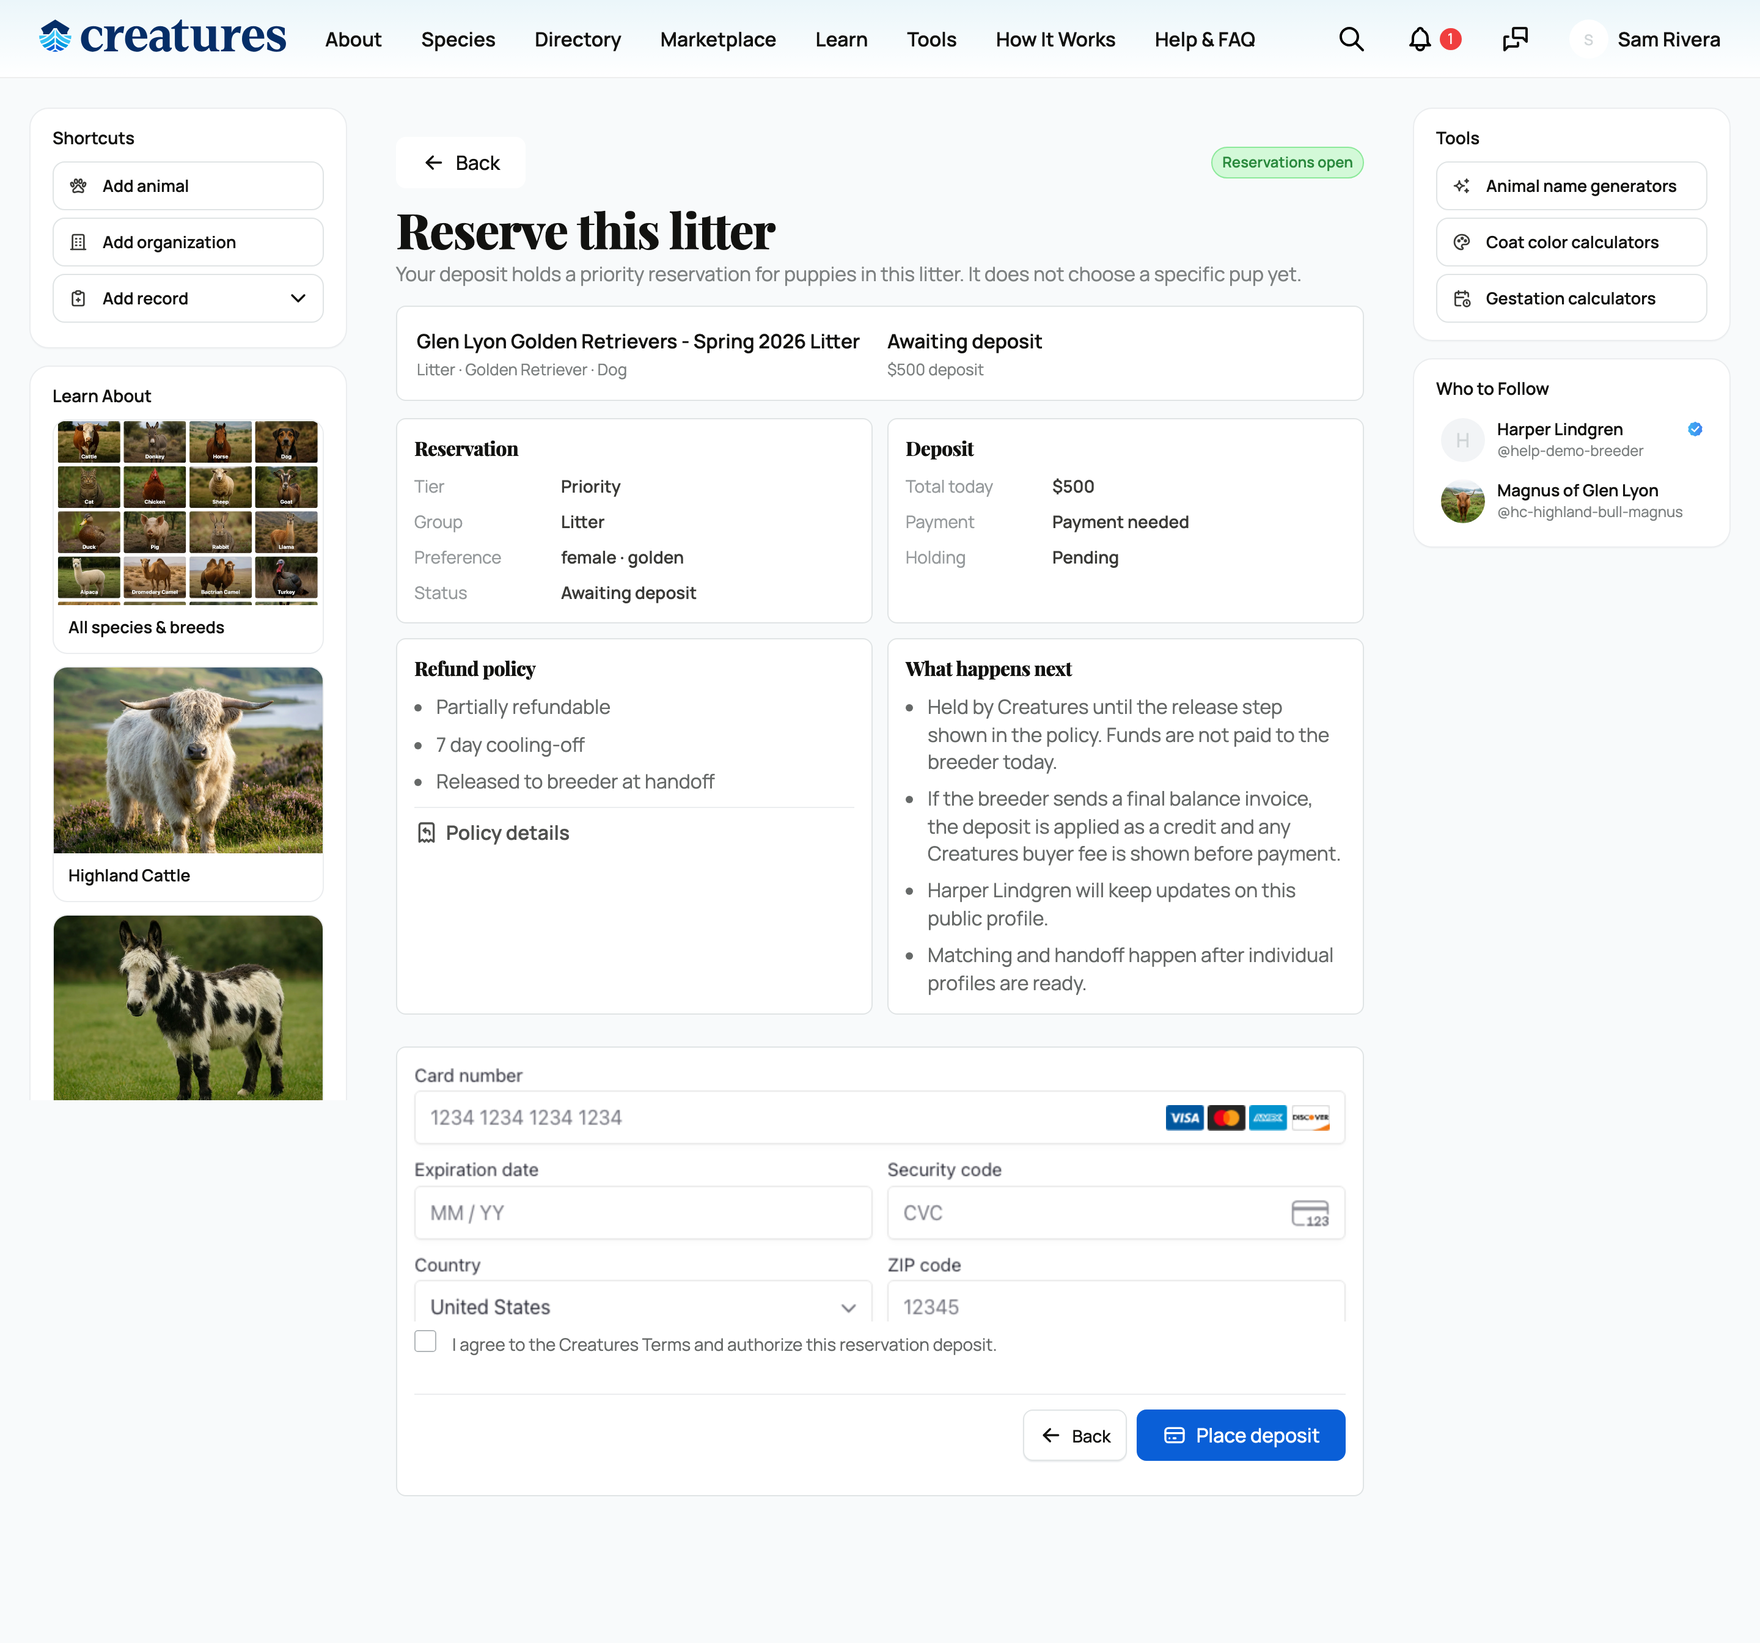
Once the payment goes through, the buyer's reservation is held, and both of you can see it.
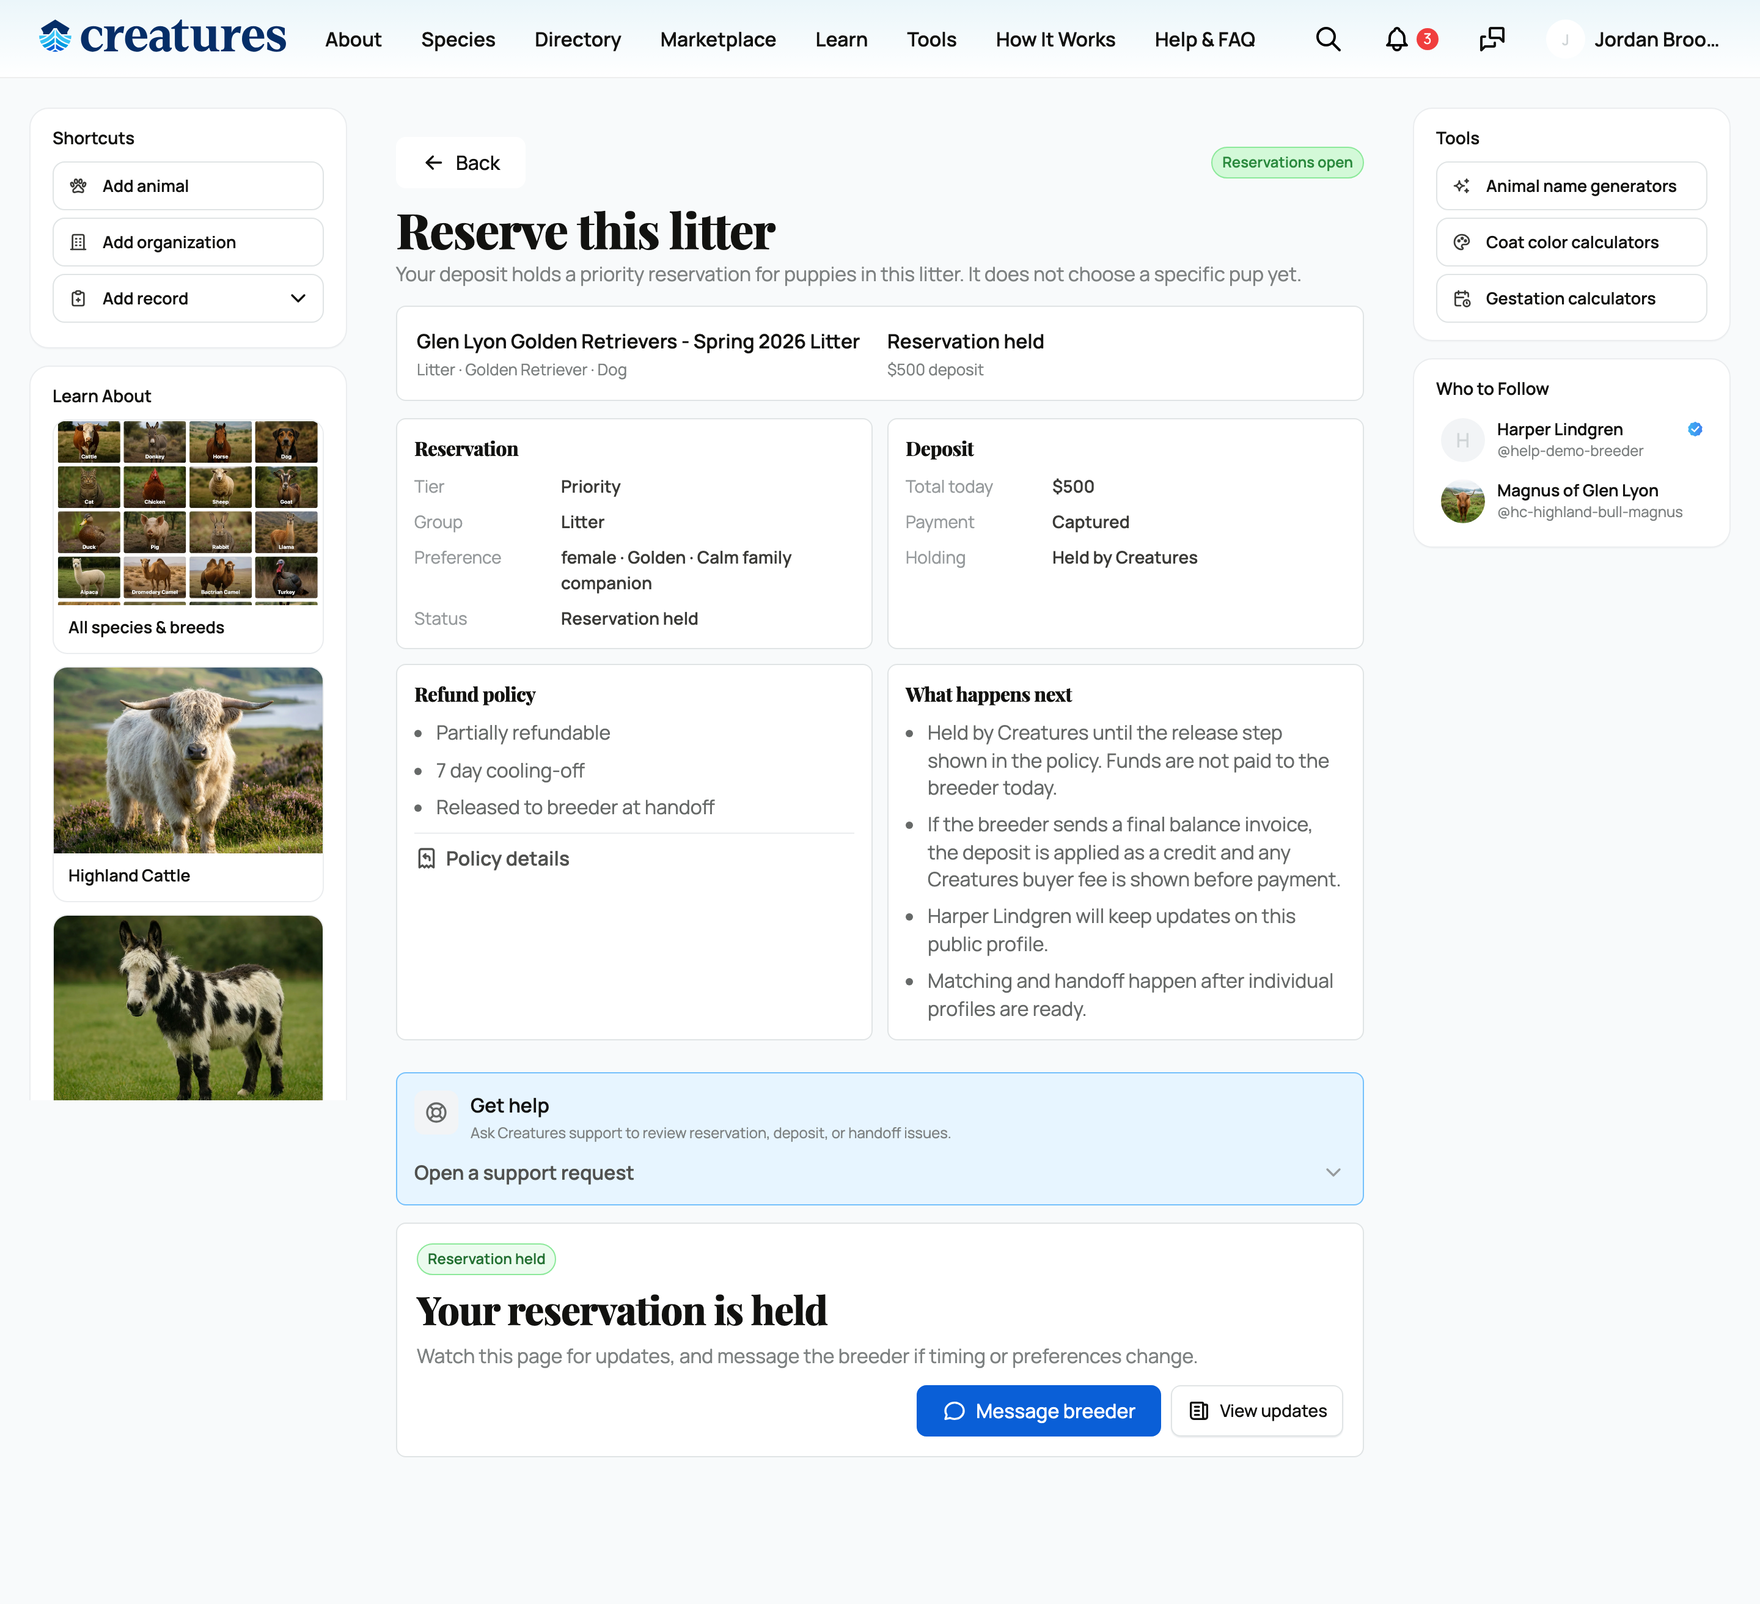
On your Applications tab, each accepted buyer shows their deposit status (for example awaiting deposit, held securely, or refunded), so you can see at a glance who has paid and who still owes a deposit.
Step 5: Match and hand off
When the animals are born and ready, use Promote to individual profiles to create each animal's profile and match it to a reserved buyer (the promote step lets you attach each new profile to a held reservation). Completing the handoff transfers ownership to the buyer and releases the deposit to you according to your refund policy and release setting. The deposit is applied as a credit toward the buyer's final balance, so what they paid up front counts against the total.
Related information
Updated on: 23/06/2026
Thank you!